Bokashi Composting 101. Dramatically Cut Your Families Waste.
Anyone that knows me may well know I’m a little overly passionate about composting!! Yep I was that person that asked for a compost bin for Christmas. Mat my partner rolled his eyes, my Mum understood and brought said gift. Though I don’t understand how you can’t be!! Seeing all your kitchen scraps go into a yukky old bin and come out months later as “black gold” that will nourish your garden. Amazing to me.
However this past year I have upped up composting game. Forget just throwing in my potato peelings. I’ve been researching and learning everything about how to organically up the production in my garden, increase the amount of compost I produce, plus increase the quality and now I have also discovered a system to turn ALL of our kitchen waste into said black gold. Enter Bokashi composting.
What is Bokashi?
Bokashi composting is a method derived from farming methods in Korea but invented and practiced in Japan by Dr. Teruo Higa. Bokashi ferments food waste into organic matter that can then add nutrients to soil and improve soil structure.
You’ll need a few extras than you would with just a regular compost bin, mainly Bokashi Bran, which is a sawdust like mixture made up of lactic acid bacteria, yeasts, photosynthetic bacteria, actinomycetes and fungi which will essentially ferment your food in a couple of weeks to turn it in a state in which is will break down easily in your soil or compost bin quickly and nourish the soil. It may sound complicated but is really very easy.
The benefits of Bokashi Composting for us.
I have found this system particularly great for us as a family with young children because as much as I try to limit any food waste to zero, this is not possible with kids. Deciding they don’t like something they loved last week, eating a bigger lunch at nursery than I thought and then not being as hungry at dinner, spaghetti on the floor, left crusts, over estimating the amount of pasta (always). These things added up and I hated seeing even the scrapping of dinner or ends off bread go into the bin. Bokashi has meant that all of this has become something useful to us and will no longer end up in landfill. This has meant our yield of compost has gone up dramatically, helping me out in the garden.
How to Get Started with Bokashi.
Getting started is very simple. Here’s a quick step by step guide on how to start and how the system works.
Get a Bokashi Bin System with Bokashi Bran.
You’ll need to buy a set of two Bokashi Bins. It is simple and easy to make your own (find a good tutorial here) but I found the bins you can buy easy to use, look nice when in the corner of your kitchen and make life easier with draining off smelly liquid. I have these ones from I have these ones from Gardening Naturally, which comes with the bran as part of the pack.
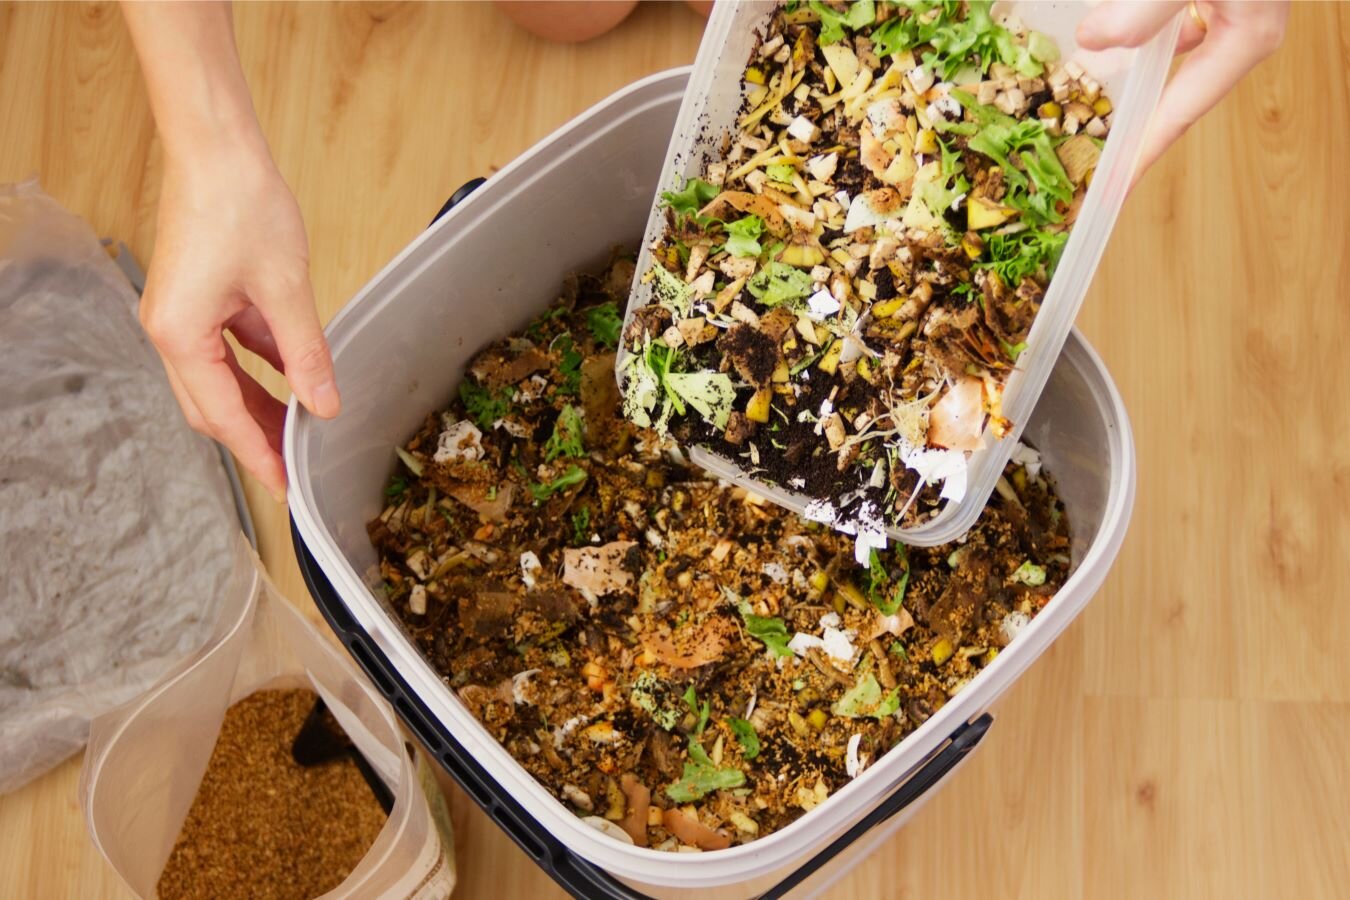
Fill a caddy or container with your kitchen scraps.
Any container will do. I have a compost caddy that holds around 4 liters. This seem to be a good amount to make one layer on compost in the Bokashi bin. Chop up anything large so it can be compressed easier once in the Bokashi bin.
The reason I fill a compost caddy first rather than throwing every little bit into the Bokashi bin is because Bokashi works as an aneobic system (without oxygen) unlike traditional composting which needs oxygen to break down. The less you open the bokashi bin lid the better.
Once full empty into Bokashi Bin.
Press down with a utensil to get out as much air as possible.
If you buy a set they usually come with a handy tool for pressing the air out. If not a potato masher also works perfectly.
Add a layer of Bokashi Bran.
A few large spoonful’s to cover the contents is fine. .
Replace lid, and repeat until bin is full.
Make sure the lid is on tight at all times, opening only when necessary to keep as much air out as possible.
Set aside for two weeks at room temperature, draining off any liquid every few days.
Draining the liquid will stop the Bokashi becoming smelly. If you have brought a Bokashi bin the taps at the bottom make this easy. The liquid is actually very useful although a tad pungent. Not bad smelling, just strong. Dilute it with water and use as a fertilizer on your plants.
Fill second Bokashi Bin while the first is fermenting.
Dig into a hole in the garden or add to a compost bin.
Now you can dig the Bokashi (or what is known as pre-compost) into the ground or add it to your compost bin.
Wash out bin with hot soapy water and start the process over again.
What can I put in my Bokashi Bin?
You can add ALL your kitchen waste to your Bokashi Bin. Including, fruits and vegetables, cooked and uncooked foods, breads, pulses, pasta, meat, fish, dairy products, small amounts of plant based oils, even bones.
Egg shells, plastic free tea bags and coffee are also great to be added. Eggs shells in particular are extremely good for the soil and break down better in a Bokashi bin than is a normal composter.
What can’t I put in my Bokashi Bin.
Although you can add small amount of oil to your Bokashi bin, avoid adding too much liquid as this can make you Bokashi go bad. Do not add water, milk, fruit juices or anything that is not organic matter, such as plastics.
Carboard, paper and garden waste are also good for composting, however I add these to my regular compost bin to break down and mix the Bokashi into this. Adding things like toilet rolls and egg cartons take up too much space in a Bokashi Bin and leave room for oxygen so I find it best to leave these out, recycling them if you do not have a compost bin to put them straight into. They are great for adding brown matter to your compost bin if you do, otherwise your compost can become too wet.
Read: A beginners guide to composting.
What do to once your Bokashi is fermented.
Once your Bokashi has fermented for two weeks you will have “pre-compost”. This needs to be dug into the ground or put into your compost bin to break down completely. This process happens over another 2-3 weeks. It will then be ready for planting.
There are serval ways you can put the bokashi into your soil.
Create a trench.
If you have room in your garden or on your allotment you can dig Bokashi straight into the ground. Create a trench a foot or so deep. Add the bokashi pre-compost in. Mix it in with the soil, making sure you cover the top 6 inches in pure soil (you want the bokashi to be completely covered.) Once this area of ground as sat untouched for roughly two weeks it will no longer be acidic and the food should be broken down into the soil. You can now plant into it.
If you do not have room for digging trenches you could do small ones in and around your existing plants which will then work its way into the soil and improve it.
However I do NOT like this method. Simply because I practice No Dig in my garden. No Dig is a method of gardening where you touch the soil as little as possible. By digging you as disturbing the natural balance of the soil. The more we dig the more you knock about and even kill micro organisms, fungi and worms in the soil who do such a good job aerating the soil and nourishing it for us.
So yes, while the bokashi will improve soil structure and nutrients in the soil if you dig it in you are still messing with nature and the natural order of things, which is why I prefer to add my Bokashi to my compost bin to accelerate this, and then mulch on my compost, or use it for potting when I need to.
Mix into a compost pile/bin.
By adding Bokashi pre-compost to your compost pile or bin it could accelerate it by up to 50%. You simply need to mix in the Bokashi to the compost already there, which will aerate the compost bin at the same time (a good thing) and make sure it is covered. You can do this by add some extra garden soil on top, or this the compost is broken down enough already, mixing this over the top.
Use a large container.
Using a large container to mix your Bokashi into is a great solution if you have limited space (perhaps just a balcony) or you do not have a compost bin. Simply half fill a container of soil, which could be from the garden, brought potting soil, or soil from old pots you want to reuse. Mix the Bokashi pre-compost in, making sure it is covered, close the lid or put out of the way and wait 2-3 weeks until all the food has broken down before using it on your garden on in your pots.
This is also a good solution if you do prefer to dig the bokashi into the soil to do in winter months when the ground might be frozen.
What to do with Bokashi if you do not have a garden or room for a compost bin?
Bokashi is often given as a solution for composting if you live in an apartment, flat or house without any outside space as you can keep the bin easily in your kitchen without it taking up much space or smelling. However this does not account for what to do with the waste once it is fermented. Here’s some ideas if you do not have a garden.
Add to a container and use for pots on a balcony gardening.
As I spoke about above you can easily make your own Bokashi soil factory with a container and some old soil. Here’s a great YouTube video of Her 86m2 doing just this for her balcony garden. It really is amazing what you can do in such a small space.
Donate your Bokashi pre-compost.
Ask around with friends and family if they have a compost bin and would like your fermented food to help boost it. If not have a look online for local gardening community projects, or allotments. Gardeners ALWAYS need more compost, ALWAYS.
And don’t worry about having to do this every 2 weeks. Once the enzymes in the Bokashi Bran have done their job fermenting the food it will lie dormant. Meaning you can store it for a few weeks without it becoming smelly. Wait until you’ve got a good amount then take it to whomever is gratefully taking it.
What to do with Bokashi Tea?
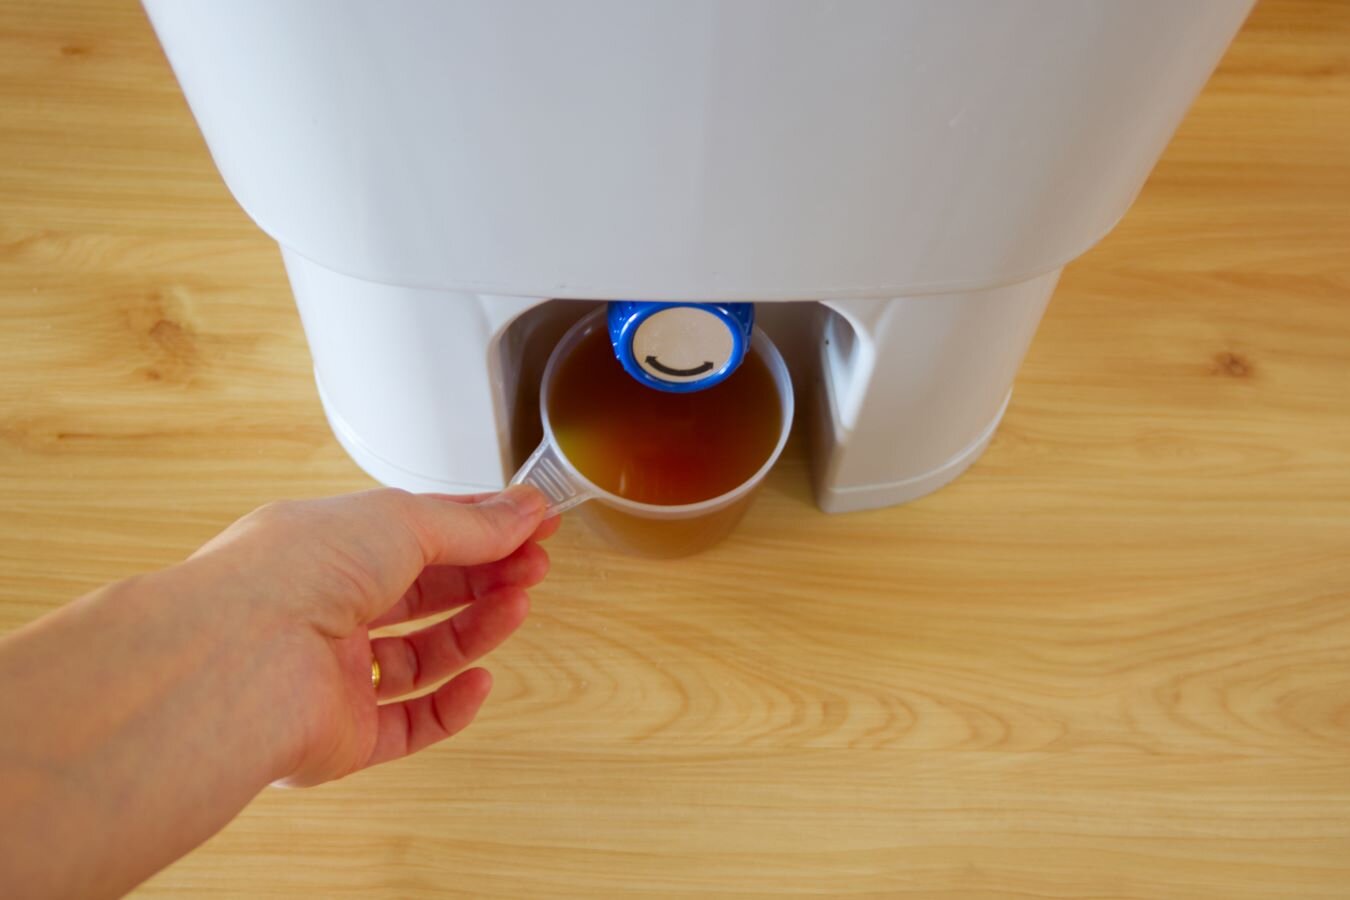
Bokashi Tea (the liquid you drain off from your Bokashi bin, essentially bin juice) is high in nutrients and makes a great fertilizer for your indoor and outdoor plants. You can also pour it down the drains to help unblock them.
It is highly concentrated and acidic which is why pouring it neat down the drain which is it works great for unblocking it, but on your plants you will need to dilute it 1:100. That’s 1 part Bokashi Tea and 100 parts water.
What to do if my Bokashi Bin has mould in it.
If you notice your Bokashi Bin has dark mould on it, it is a sign that something has gone wrong. Either dispose of the contents in your regular black bin, or bury it deep in the garden with some extra Bokashi Bran on top, leaving it to decompose for a few months.
White mould however is perfectly fine within your Bokashi bin.
Dark moulds such as black blue or green mould are a sign of rotting, when you want your food to be fermenting not rotten.
If there is only a small amount of dark mould you can try and save the contents by adding extra Bokashi Bran over it. The mircos in the bran may well out compete the mold. Check back in a few days later to see if the mould has spread or not. If it has it is best to dispose of the contents.
Mould usually grows in a Bokashi bin either because not enough bran has been added, so you may want to assess how much you are putting in, or because it is not airtight enough. Make sure you keep the lid on properly at all times and there are no cracks in your bin.
What to do if your Bokashi Bin smells.
A Bokashi Bin will smell but should not smell bad and you should only be able to smell it when the lid is off. It should smell acidic, like pickling. If it smells rancid or rotten there is most likely a problem with your system and the contents should be disposed of.
The same problems would go for a smelly bin as one with mould on. Follow the steps above to troubleshoot any problems.
What is Bokashi Bran made out of and is it sustainable?
Bokashi bran can be made out of any organic material which has been finely ground down. EM-1, Molasses and water are added. Buying as local as you can is the best way to make this process more sustainable, a farm that uses organic practices is better. Bonus points for plastic free.
I have been ordering from Wiggly Wigglers, a UK based farm that make their own Bokashi and it does come in a paper bag. It cost’s around £6 for a bag of Bokashi which should last you 3-4 months. Order in bulk or pay for a subscription to keep the cost of postage down too is always a good idea. Also because I always forget to order more BEFORE I run out.
Has this inspired you to up you composting game? I hope I’ve made this process simple for you so you’ll soon be reaping the rewards or less waste and more nutrient rich soil.
Good luck.
Hannah xx